Ken and Joy - Wedding planning blog
skip to main | skip to sidebar

September 3, 2009

073 - My Girls’ Dresses - Part 2: BM Sister

The sewing frenzy is ON!

I figure that since I'm asking for your advice on the dress I'll wear "to make it legal" I should star kicking the pending projects I have on the sewing department so I can phisically be able to sew my "other" dream dress :)

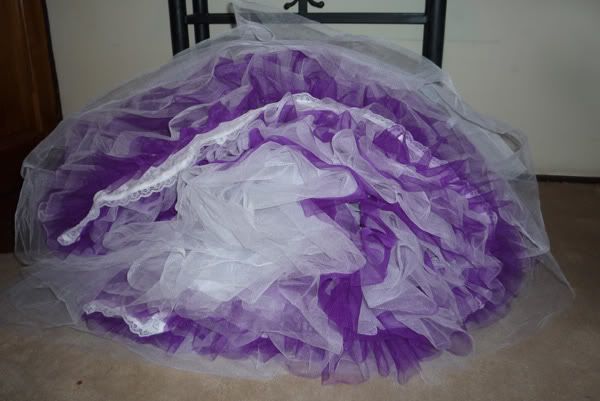
If you remember I show you all the first of  My girl's dresses: MOH not so long a go, after I post about it I realize i forgot to mention one little detail I was attempting to conquer. I wanted MOH dress to be REVERSIBLE!! how cool would that be? Of course she was excited about the idea too, she would have the purple I wanted as one dress, and the purple she picked (a much darker one) on the other side as dress number 2! and here a little peek of the MOH dress and a close up to the inner fabric color and texture.


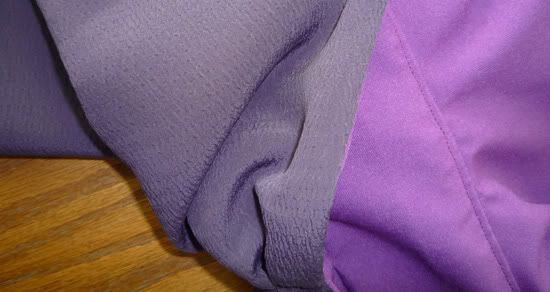
{ I really liked the contrast on the different colors and textures fabric }

But now to the dress story I wanted to share!

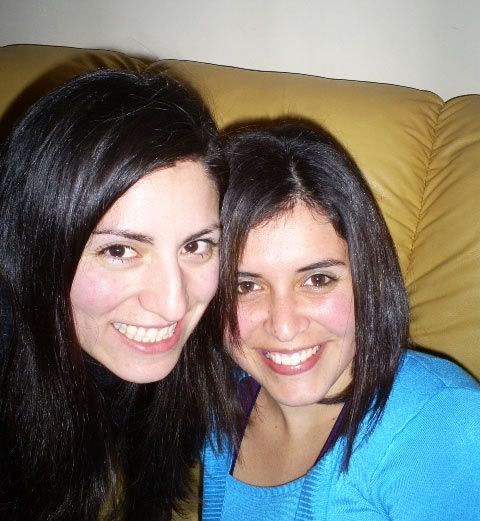
This is Poodle sister :) She is a 15 year old girly girl, crazy over Jonas Brothers and one of my best friends. She means the world to me, but when it comes to design for her, she can be a pain in the butt. Like any normal teenager she changes her mind prob every day - Um ok I do that too, so I should not complain! lol


{ Poodle sister and I at her Middle School (Educación Básica here) graduation }

Anyway, we saw probably 50 different dresses so she could have an idea of what she wanted, on a month she changed her mind 6 times, so even though I was on a risk that she would change her mind again, I started cutting fabric with no turning back. We started with the bottom of her dress, she wanted pockets and a different feel to what I did with MOH's bottom dress.

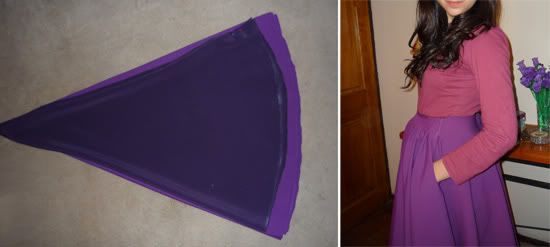
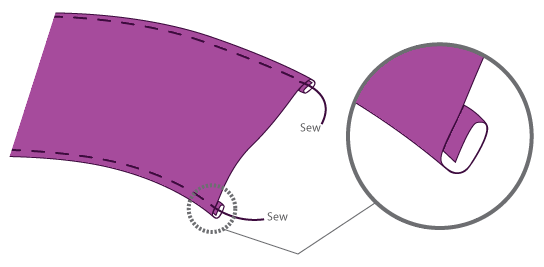
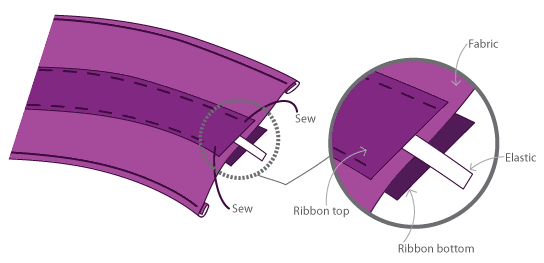
{ For the bottom I cut two big circles, folding the fabric leaving the clear color 2" longer }

I sew everything like she wanted and moved to the top. As usual I used my dear newspaper to make my pattern and measure it on my sister, because well I'll make my DIY dress form after the wedding :)

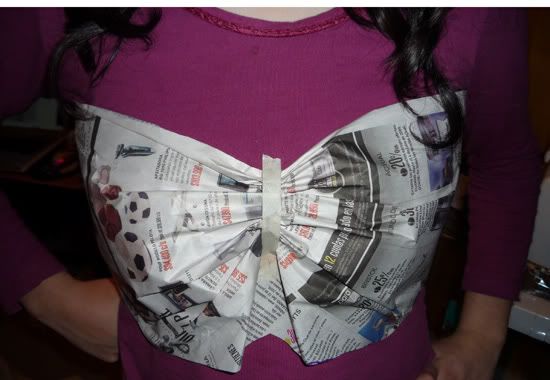
{ I measure and play with the newspaper and tape to fit the desire form }


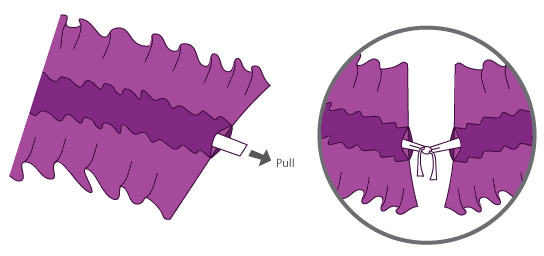
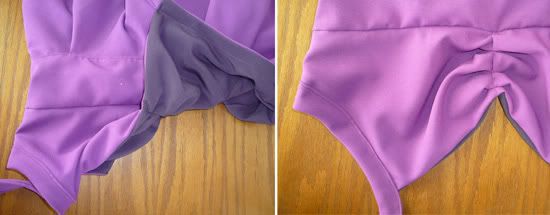
{ Then I cut the newspaper pattern to both of the fabrics, I also made a little piece to tie the center }


{ I pin everything on place to sew it easily - on the left you can see the details of the bottom part }


I sew everything together really fast so by the time Sister Poodle was out of the shower she could not change her mind - lol

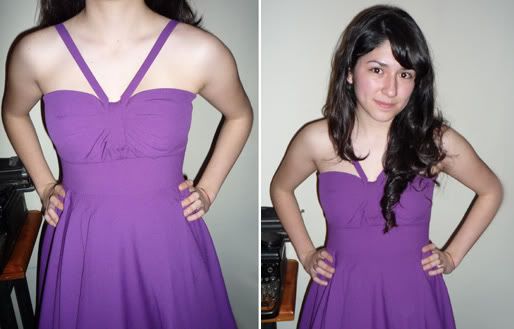
{ Here's the first fit, I still needed to sew the details on the front }


I cut sister Poodle's head on that picture because she was not happy with the way the dress fit her.

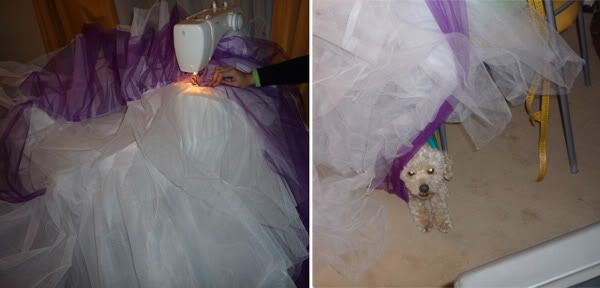
A little behind the scenes - while I was figuring out the dress and sewing like a crazy woman guess how was on my lap the whole time!?? ... yeah! your right! CURLY! Every time I made him leave he will wait until I had to sew again and jump to my lap, but I was almost done so I call my sister again.

{ There's no way to make him leave when he's comfortable hehe }

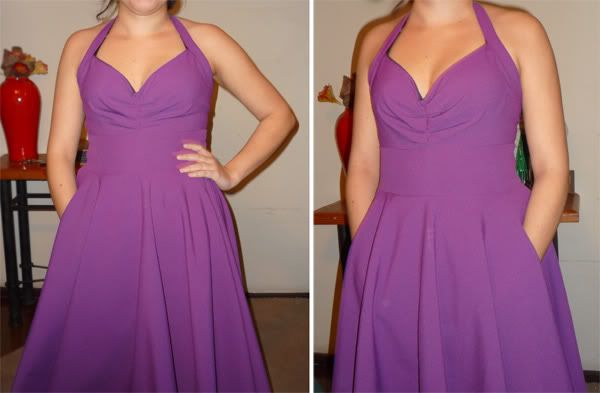
On the first fitting she was giving me the "I'm not wearing this dress" kind of look because she said the ladies were feeling weird, but I fixed the problem, finish the front sew the straps to the back and force her to take her pajamas to "really feel" the fit of the dress.

{ Second fit and FINALLY a happy face!!! }


After the second fit she loved it!! I still need to iron it, but I really liked the way it looks :)
Happy BM = Happy Bride!


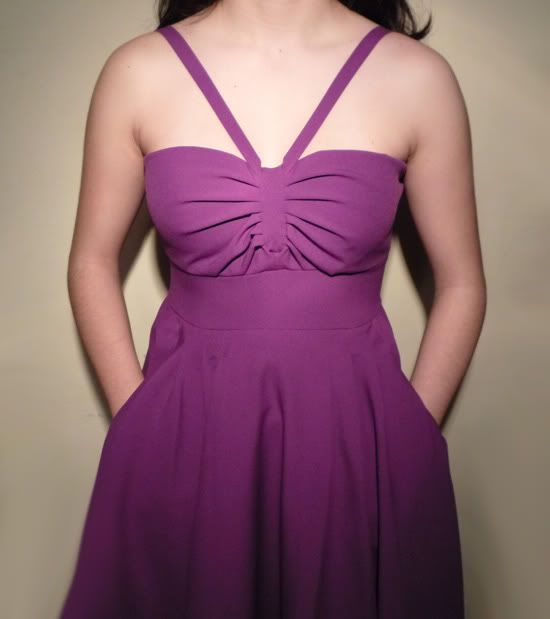
{ Final dress! two done, two to go! }


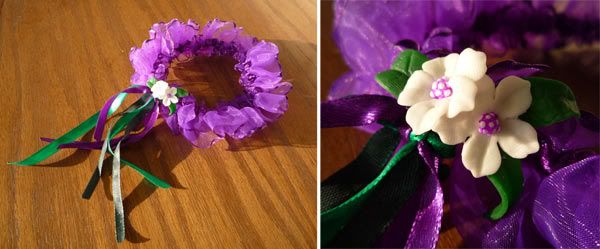
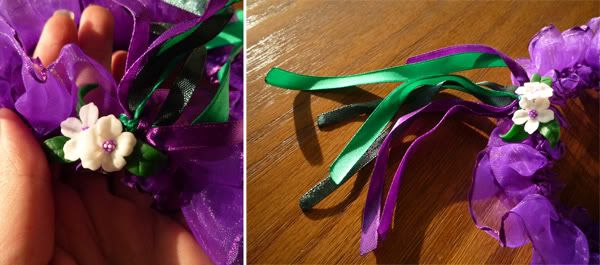
Now the dress is done, but I though we could spice it up a little bit by adding a sash with some little flowers on the waist - So in order to convince Poodle sister this idea could work, I had to show her the flowers I wanted to use. Trying not to burn my fingers like I did with my Hair flower, I created 4 of this flowers in different sizes.


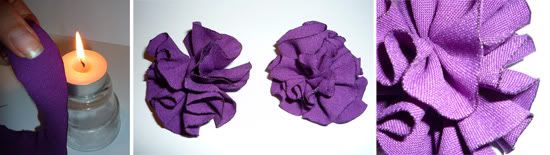
{Sealing - sewing - ready! }


This is the story of the second dress so far, I still need to convince my sister we can do something else to the dress, but I'm happy for today. I got her to like the dress and I'm happy with that, mission accomplish!!

But I could really use any input or ideas,what else would you add to this dress?


--------------

Previously:

My Girls' Dresses - Part1: MOH

Posted by Joy @ HowJoyful 1 comment:

September 1, 2009

072 - A dress to make it legal

A few months ago, Mr. Poodle an I decided we were going to marry “on paper” months before we say “I do” next January at his grandparents’ ranch.

Even though neither of us wanted to be legally married before our wedding celebration, we had to go this route after finding out that I wont be able to work until 3 to 4 months after we file for my AOS (Adjustment of Status - that’s the step that follows the legal marriage). It takes that long to get a Green Card (job permit) in the mail.

So basically, we had two options:
  • I could move there and work on the wedding planning for about two months, forget the idea of trying to get a job, and we would get married in January and apply for AOS after that. This would give me an extra 3 to 4 months to sit on my butt and try to find something to do after the wedding.
  • OR, I could move to California and we could just sign the papers to “make it legal”, and apply for the AOS as soon as possible. I could use the time waiting for the AOS to process to craft and go crazy over our wedding related tasks! This way, the timing would work out almost perfectly, giving me just a couple of weeks after the wedding to start the search for a job.

We decided the last option was the way we wanted to go and also decided that the “legal date” will not be important to us. We’ll celebrate our anniversary on our wedding ceremony date, not the “legal date”.  Actually, none of our friends know about this (only our families - and now YOU! :P). Plus, I don’t want to be address as a MRS. after that day, because we are not giving that date the symbolism of the “BIG STEP” we will be making. We will call each other husband and wife only after our January event.


So, it’s not a big deal, and I bet Mr. Poodle will wear short pants and a shirt that day. BUT, I’m a girl!!! I can’t help it! I need a cute DRESS!

I know I’ll have some other occasions to wear cute dresses to, like a shower (If I happen to have one) or the rehearsal. But I know we will end up taking at least one picture that day, and I don’t want to be in shorts and a shirt.

I still have a lot of work to do in the sewing department (finishing the top of my dress, table runners, and 3 BM dresses), but I’ll have nothing else to do once I move, since I’ll lose my actual job. (Yay! Oh no, I mean… boo. :P) So, another dress project would be great!

So, here are my inspiration dresses!! I though it would be nice to have a “bridal-looking” dress, with soft colors, a wavy look, and cute flower accessories.

 - Rose and Ruby Inspiration


Maybe a little hint of color like on the right ones?

{ Dresses From Rose and Ruby - via Beauty and Lace }


Then I headed over to one of my favorite places where I like to web window shop—Anthropologie! I found these two cute little dresses that I really liked. They’re not totally bridal, but I could easily wear any of these  again!


- Anthropologie Inspiration


{ Clustered Pedals Dress by Anthropologie }


{ Behind-the-Clouds Dress by Anthropologie }


Then, I stumbled upon Sika Designs. I’ve had these dresses saved on my computer and needed an excuse to make something similar ever since I started the search my wedding dress. I was so blown away by these  cuties!


- Sika Designs Inspiration


{ Dresses from Sika Designs - Fusion Collection }


{ Dresses from Sika Designs -  Wonderland and Spellbound Collection}


I have so much inspiration in my head that I need some help choosing an option, because I like everything, and I can’t make 3 dresses!

As far as we know, we’ll be signing the legal papers soon after I move to California. So weather will not be a huge factor, and I could pretty much wear any of the above dresses.

[POOL]

  • Rose and ruby Inspiration - Soft colors, lace, waves and ruffles
  • Anthropologie Inspiration - Solid colors with soft details
  • Sika Designs Inspiration -  Stamps with "retro king of looking" shapes

Which of the dresses do you think I could continue to wear on a daily basis?

Posted by Joy @ HowJoyful 4 comments:

August 30, 2009

071 - A cute flower for my wedding day

Remember when I shared with all of you my first attempt of a hair flower? well - yeah, clay was not the right material after I realize how dangerous my head was ( I use to poke Mr. Poodle on the eyes with whatever I have in my hair)

So fabric was a really tempting option :) Miss Bear Cub and I wanted to try to make our owns, so while I was visiting her (remember our BeeTV?) a few weeks a go, siii! We started playing with cute fabrics, pearls, feathers and beads.

This was our Monday morning project! -Um, well - if you remember the amount of "Pisco" we had the night before (While BeeTV broadcast) you can guess we were not on our best shape to craft lol - I did as much as I could, but I didn't finish my flower. I left that cutie waiting for me while I research for the beads and pearls I wanted for the center - now finally! - I'm done!!


{ My finish flower! }


Of course, as always, I wanted to share with all of you how I made mine, just in case you want to make your own :)

This was my very first flower, so that means I'm not a Flower expert :P I try to follow every instruction I found online, but at the end I rather go my way and I didn't cut the shape of the flower on fabric (Like I was supposed to do on Martha's tutorial) I cut 2 different sizes of pedals (approx), starting with 3"x2" rectangles (for the big ones).


{ Not all of the pedals are exactly the same size or shape,
I thought it would look more real that way }


After cutting all the pedals, we light a candle and seal the fabric, just like Mrs. Piglet did on this tutorial.

{ Here you can see the finish shape }


Once I had all of my pedals ready, I stitch trough one of the edges and attach together the first layer of pedals.


{ Here you can see the pedals sewed together, this was the bottom layer }


I also cut tulle pedals, now in this case I didn't run the edges trough the candle, because the tulle burns way faster hehe, I try several times but I ended up with an ugly pedal lol


{ You can see the tulle pedal layer on the left and the next white fabric layer of pedals
attached on the right }

I ended up using 5 layers (of 6 to 8 pedals each) of white fabric and 2 layers (of 6 pedals each) of tulle for the flower


{ I found some cute white feathers that I sew to one of the sides}


{ I bought different green and purple beads to attach on the center of the flowers }


I played around with all the beads until I was completely happy with the result, I fist try to just sew them to the flower but the small ones moved too much so I ended up hot gluing them to the center. I grab the beads one by one with tweezers and apply tiny amounts of hot glue to the bead, then I proceed to place it exactly where I wanted.


{ I used some lilac, purple and purple clear beads; white feathers and tulle }


I only have a small idea of how I want my hair that day - Big curls!! So I hope the flower looks better once my hair is all pretty :P

{ As usual, Curly couldn't resist a camera - Both of us modeling my flower }


After I finish my flower I decided to try and make flowers for my girls, i know MOH wanted one for her hair and my little sister wanted one for her dress, so I started playing again, this time with purple fabric and the green beads.


{ I used some left overs from one of my last projects, remember? }


{ This time I used different colors and sizes of green beads }


I still need to Iron this flowers to shape the pedals a little bit more, but I am going to make that once the flower and dresses travel all the way to California. because otherwise I'll have to work on that two times hehe. If you want to practice I used this small iron, I bought that on my first trip to the USA, it's so small and handy.


I also made another one with a different center so they can have variety to chose the one they like best.

I've notice we are all going crazy over flowers this days, so did you fall into the hair-flower-wagon? Are you DIY yours? Are you buying on Etsy? Want to show off?


Posted by Joy @ HowJoyful 4 comments:

August 28, 2009

070 - After several hours of Labor, we bore..

... Mr. Poodle's Ring!!

So before I show you the ring, here’s a little fact: Yesterday, my MOH boarded a plane to go study English for 6 months in Colorado. She was extremely nervous because it is going to be her first time there (all alone, too) but she’s REALLY excited about the experience, and the fact that after I move, both of us will be decently close to each other. She will spend the holidays with us and will help us with all the massive DIY projects for the wedding. She rocks, I know!

So - before she left she handed me "Mr. Poodle's future precious!" I'm SO EXCITED it's already finish!!

As you know, it all began with this idea: I happened to pick up two pieces of wood on our Patagonia trip. After random conversations about other options for our rings’ materials we decided that we could keep that trip in our memories forever by incorporating the wood into the rings.


You know the drill - If your name happen to be Mr. Poodle, RUN away from the computer AHORA! and DO NOT push the read more :)


Read more »
Posted by Joy @ HowJoyful 3 comments:

August 26, 2009

069 - Honeymoon on My Hometown: "Chile" Part I - Santiago

Yeah baby! - I might not like my hometown on daily basis (but that's just because I would rather live in the middle of nowhere hehe) - But last December, when Mr. Poodle visit me here in Chile, I got the chance to fall in love all over again with my pretty but sometimes too much of a city Santiago!

{ Image Source (Link) }

Just follow that sign!! It will take you to the Santiago airport " Arturo Merino Benítez - SCL" this will be for most of you, travelers, the first Chilean land you will step on ;)


Read more »
Posted by Joy @ HowJoyful 2 comments:

August 25, 2009

068 - Following my heart

... but, to the other side of the world?


{A little drawing form yours truly }


My of my family has always pushed me and encourage me to always follow my heart and do what makes me happy. And of course that is something many of my friends really like about me, BUT on this case we are not talking about pursuing a "not traditional career" or starting a new sport. This time things will get a little extreme.

I will be moving 5,576 miles away! yup pretty much to the other side of the world - And even though my family is happy because they know I'll be happy. There's different emotions and stages we had worked together in order for them to understand my decision.

I am super close to my mom and sister, we are really good friends and ever since my dad is not longer with us (He did not die, just left our lives a year a go) I've been their stronger support, we have team up in order to stay together and strong. I feel I am truly blessed my them and it is not only hard for them but also hard for me to go away from them and start my new life - and future family.

I know distance does not mean the lost of the communication or the love (My relationship with Mr. Poodle proves that) but I definitely won't feel I'll be able to protect them the way I do now, and even tho they try not to show me. I can feel the the different emotions every time we talk about it.

The change in my life will be very drastic, I am leaving not only my family but also all my friends and the people that had watch me grow through the years. I know moving is a quite normal step in everyone's life and with the kind of technology we all have access now, distance seems like a tiny detail. But I cant help but feel the emotional roller coaster of being happy about finally being with Mr.Poodle butat the same time sad about leaving everyone here in Chile.

I am the kind of person that smiles and thanks God for the blessings in my life every day - and every chance I can I tell my family and friends how much they all mean to me, how much I love them and thank them for touching my life and inspire me :) But lately I've feel like I need to tell them even more often, hug them tighter and laugh together even louder.

This move is not only going to change my life in the future (once I become Mrs. Poodle) but is changing my life at this exact moment, all this future changes had made me appreciate even more the ones I have around me now, all of my friends and family. I feel so blessed because I have them, and I am enjoying every minute I spend with them. I am taking advantage of every second I have to chat, share and get together with them And at the same time everyday I thank God because the moment when I'll be reunited once again (And for good!)with the love of my life is getting closer. I feel really happy and excited about living with him and starting our new life together :) - yeah! a real mix of emotions.

Have you experience a pre-wedding event that has touch your life in a deep emotional way? Want to vent?


Posted by Joy @ HowJoyful 1 comment:

August 24, 2009

067 - A garter toss and a tutorial

I already give you all a sneak peak of my DIY garter and promise to show the final product once I was done, remember? - well... I'm done! :) and I'm here to show you all.


{ Here my final Garter! I know - Estoy como loca por el Morado! :P}

Basically I used one piece of two meter long fabric, I sew a "sandwich" ribbon to it on the center, after that I run elastic trough the center, pull and I got my garter!!, I added little clay flowers and leaf with different green small pieces of ribbon.

I always understand better when I see pictures, but this time (because it was my very first project) I forgot to take pictures - so I draw my process to show you all ;)


First I sew the edges of the fabric, fold the ends like on the drawing and your good to go, I used a fancy stitch so it would look "cooler" but if you don't know how to work those stitches you can just go with the plain normal one.


After you have your ends done you need to make a "sandwitch with two pieces of ribbon and your fabric - IMPORTANT: Don't put the elastic until your done sewing! I just drw it there so you can know where it goes.

In order to keep the layers on place, secure them with clothespins. Then proceed to sew the edges like shown on the upper drawing.


After your done with sewing the edges, run the elastic like on the drawing, pull and tie both ends. Remember to measure so it doesn't get too tight or too lose on your leg.

After that you need to sew the front faces together and your done!! Sew or glue embellishments as desire ;) - what I did was attach the flowers with different green ribbon :)


Are you DIY your garter? what to share your inspiration?


Posted by Joy @ HowJoyful 3 comments:

August 19, 2009

066 - Crinoline - The evolution

Ok maybe evolution is too much of a word for the change I made to my crinoline, But sounds so cool!

Remember when I showed you all my crinoline? Well after I look at some pictures I decided I wanted to spice thing a little bit, like this.

{ Image Source (Link) }


but dyeing it was not really an option to me, because even tho I love the way it looks, I don't want everything purple, I want white and purple. But re-doing the crinoline was not an option to achieve my desire look, so I opted for ADDING!

Yes! puffier!!! :) I know I'm possibly going to end up looking like a marshmallow, but I'll take the chance - I have a feeling it will end up looking cool - or else I'll be always remember as the white with little purple details marshmallow bride :P (Crossing finger big time at this moment)

So I ran to my "fabric supplies heaven" and got 40 feet of purple tulle at $9,60 oh! yes! (Told you! heaven fabric place!) Once home I cut long pieces matching all the height of my white layers and sew them together.


{ Mom Poodle is not really good at taking pictures lol - eyes closed!
and she said it was a perfect picture }


{ I had tulle everywhere, so by the time I started sewing my baby Poodle (Curly ) thought the crinoline was a tend for him to play at}


{ This is how my crinoline ended up looking }


I'm much happier now :) because I can surprise with a little bit of color under my dress. I just can't get away from color, specially purple! I love it so much!

Are you attempting to add color to your dress? if so, what's your plan?


Posted by Joy @ HowJoyful 3 comments:

August 8, 2009

065 - My girl's dresses - Part1 MOH

Remember when I showed you all the inspiration dresses I got together to show my girls; the trend I said I loved SO much and the card I made to re-ask them to my on my party? Well on the card I sent them fabric sample so they can "see" the fabric I got on sale (Yup! I always look for sales hehe) it's a really cute purple fabric, so now sadly I wont have the different shades as an option (I know! cheap me!!) Anyway on that card I told them to pick a dress each, and offered the dresses as a gift from this Poodle bride :) - Ohh my! I'm feeling this is going to tress me out! but I already told them hehe

Well to my surprise, 2 of them already pick (The Chilean girls) and both of them chose the same bottom for their dresses, but the tops are going to be totally different!! You know - I wanted them to "not-match" so badly, hopefully the other two BM wont choose the same one.

A couple of weeks a go my MOH went through a very tough situation, because of that she wasn't sure she was going to be able to be by my side on my wedding day (*almost crying!*) - I was really really sad and decided that if she couldn't make it I rather not have a MOH, than fell like I was "replacing her" by asking someone else . Gladly, and to my surprise and JOY she will be THERE!!! (*Happy dance!*)

{ Yay! this is us celebrating her "comeback" to my wedding party! }

So last night we got the chance to celebrate and work on the pattern for her dress. I know this not the "proper way" to make it but it works for me, usually I draw on newspaper (I always tape sheets together for the bigger pieces) and then cut them and fix the pattern on the person I'm working - I soo wish I had one of those PRO tailor's dummy :) But well until that day, I have to work with what I have - hehe


{ My newspaper top pattern and MOH modeling for us lol }

So after about 3 glasses of rom each, we finally were able to move, work on fabric and forget abut the newspaper :)


{ I know I get so serious when I'm sewing! -
The first fit = not good! but she loved the pockets :) }


So the first fitting was just with clothespins, and we needed to add one missing piece (Yup! the rom was hitting us at that point) - After about half hour we finally found that missing piece, but decided to hold the sewing for the dress sake!

Today we started early and with a slight hangover hehe, I was glad we didn't attempt to finish last nigh! because well, I would have need to do everything again! - my advice: Don't drink and sew :)


{ Second fitting! - Now I can add the straps }


{ We still have to iron it and short it to the length MOH wants }

So here the final dress, we are thinking on adding some purple tulle on the bottom just to add some more body.

This was the first dress story, 1 done - 3 to go!!

And here the question! Would you change - add something? We are thinking about getting some sleeves or wrap for her to cover and maybe a sash down the bust line. What you think?

Posted by Joy @ HowJoyful 2 comments:
Newer Posts Older Posts Home
Subscribe to: Comments (Atom)

Let's be social!

Bienvenidos!

Welcome our my wedding planning blog! My name is Joy but you'll see me here as Mrs. Poodle (and Ken as Mr.P). Why is that? Because these same posts were published over at Weddingbee.com where that was my alias.

Here you can read about the adventures, plans, ideas, and inspiration collected to shape our dream (Green and Purple) wedding on April 11th, 2010!

About Me

My photo
Joy @ HowJoyful
Chilean designer, blogger, wife, mom, sewing fanatic, obsessive crafter, upcycle passionate and lover of all things pretty. Mrs Poodle at WeddingBee.

I design: HowJoyful Design Studio
I blog: HowJoyful Blog
I Instagram: Follow me!
I pin: Pretty stuff!

We take adventures: Berefoot detour
View my complete profile

MY NEW BLOG

Now we've been married for a while, and have 3 amazing little ones!

You can visit my new blog HowJoyful to catch up on my current endeavors!

Or you can check my Businesses the HowJoyful Studio and the HowJoyful Shop.


Looking for something?

Archives

  • ▼  2012 (1)
    • ▼  April (1)
      • 2 years a go...
  • ►  2011 (18)
    • ►  October (4)
    • ►  September (2)
    • ►  August (1)
    • ►  July (3)
    • ►  June (3)
    • ►  May (4)
    • ►  January (1)
  • ►  2010 (41)
    • ►  December (2)
    • ►  November (4)
    • ►  October (4)
    • ►  June (1)
    • ►  May (7)
    • ►  April (5)
    • ►  March (5)
    • ►  February (5)
    • ►  January (8)
  • ►  2009 (104)
    • ►  December (6)
    • ►  November (9)
    • ►  October (6)
    • ►  September (10)
    • ►  August (7)
    • ►  July (18)
    • ►  June (17)
    • ►  May (16)
    • ►  April (15)

Translate

About this blog


I am a Spanish speaker and I started this blog as a way to learn English, I was blogging from Chile while we waited on our Visa process so I could move to California and we could have our green and purple wedding. So a big portion of this planning happened while we were still dating long distance.


Ken and Joy - Wedding planning blog | All rights reserved © 2012 by Joy Kelley | I am a HowJoyful Design